Spring Boot 2.x 기준 Mail Send Client를 간단히 소개해봅니다.
기 프로젝트에 적용하실 분들은 1-2로, 신규 프로젝트로 진행하실 분들은 1-1로 봐주시면 되겠습니다.
1-1. 프로젝트 생성


1-2. Maven dependency(pom.xml) 설정
<dependency>
		<groupId>org.springframework.boot</groupId>
		<artifactId>spring-boot-starter-mail</artifactId>
</dependency>
<dependency>
		<groupId>org.springframework.boot</groupId>
		<artifactId>spring-boot-starter-thymeleaf</artifactId>
</dependency>
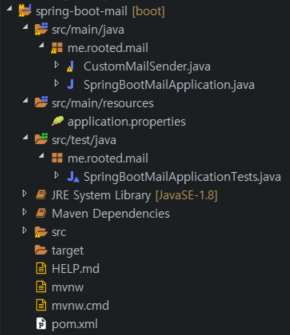
2. 프로젝트 구조

3. src/main/resources/application.properties 설정
## thymeleaf default settings
spring.thymeleaf.prefix=classpath:/templates/
spring.thymeleaf.suffix=.html
spring.thymeleaf.mode=HTML
spring.thymeleaf.encoding=UTF-8
spring.thymeleaf.check-template-location=true
## thymeleaf custom settings
spring.thymeleaf.cache=false

## mail default settings
spring.mail.default-encoding=UTF-8
## mail custom settings
spring.mail.host=smtp.gmail.com
spring.mail.port=587
spring.mail.username=yourid@gmail.com
spring.mail.password=yourpw
spring.mail.properties.mail.smtp.auth=true
spring.mail.properties.mail.debug=true
spring.mail.properties.mail.smtp.starttls.enable=true
spring.mail.properties.mail.mime.charset=UTF-8
spring.mail.properties.mail.transport.protocol=smtp
위 설정중 spring.mail.username과 spring.mail.password를 본인 계정으로 수정하면 됩니다.
4. CustomMailSender Class 생성
package me.rooted.mail;

import java.io.IOException;
import java.util.Map;

import javax.mail.MessagingException;
import javax.mail.internet.MimeMessage;

import org.springframework.beans.factory.annotation.Autowired;
import org.springframework.mail.javamail.JavaMailSender;
import org.springframework.mail.javamail.MimeMessageHelper;
import org.springframework.stereotype.Component;
import org.thymeleaf.context.Context;
import org.thymeleaf.spring5.SpringTemplateEngine;

@Component
public class CustomMailSender {

	@Autowired
	private JavaMailSender javaMailSender;

	@Autowired
	private SpringTemplateEngine templateEngine;

	public void sendMail() throws MessagingException, IOException {

        MimeMessage message = javaMailSender.createMimeMessage();
        MimeMessageHelper helper = new MimeMessageHelper(message, true);

        //메일 제목 설정
        helper.setSubject("스프링 부트 메일 전송");
        //수신자 설정
        helper.setTo("userId@gmail.com");
        //템플릿에 전달할 데이터 설정
        Context context = new Context();
        context.setVariable("test_key", "test_value");
        //메일 내용 설정 : 템플릿 프로세스
        String html = templateEngine.process("mail-template",context);
        helper.setText(html, true);

        //메일 보내기
        javaMailSender.send(message);
	}
}
5. src/main/resources/templates/mail-template.html 생성
<!DOCTYPE html>
<html lang="en" xmlns:th="http://www.thymeleaf.org">
<head>
<meta http-equiv="Content-Type" content="text/html; charset=UTF-8" />
</head>
<body>
    <span th:text="${test_key}"></span>
</body>
</html>
6. Gmail 설정(필수)

6. JUnit 테스트 코드 작성
package me.rooted.mail;

import java.io.IOException;

import javax.mail.MessagingException;

import org.junit.jupiter.api.Test;
import org.springframework.beans.factory.annotation.Autowired;
import org.springframework.boot.test.context.SpringBootTest;

@SpringBootTest
class SpringBootMailApplicationTests {

	@Autowired
	CustomMailSender customMailSender;

	@Test
	void sendMail() throws MessagingException, IOException {
		customMailSender.sendMail();
	}

}
7. JUnit 테스트 코드 실행

8. 실행 결과

여기까지는 Spring boot 2.x에서 Java Mail Sender를 이용해 메일을 전송하는 기본적인 구조입니다.
해당 소스는 Github에 업로드 되어있습니다.
https://github.com/rootedin/spring-boot-mail
다음 글에서는 템플릿에 여러 데이터와 스타일을 꾸며 이메일을 보내보도록 하겠습니다.
봐주셔서 감사합니다.
# History
'19. 08. 19 게시글 작성
'19. 12. 27 게시글 수정 : 불필요한 코드 삭제 및 프로젝트 생성 추가
'Back End > Spring Boot' 카테고리의 다른 글
| 스프링 부트 스케줄러 @Scheduled 어노테이션 사용법(@Scheduled Annotation) (0) | 2020.04.22 |
|---|---|
| Spring Boot 프로젝트 구조 (0) | 2019.12.27 |
| Spring Boot 원리 : 자동 설정(Auto Configuration) (1) | 2019.09.02 |
| Spring Boot 원리 : 의존성(Dependency) 관리 (0) | 2019.09.02 |
| 간단한 스프링 스케줄러(Spring Scheduler) 사용하기 : @Scheduled Annotation (0) | 2019.08.19 |